
QuickBooks has made accounting simpler for a lot of businesses. Everything from payments to payrolls can be taken care of with QuickBooks’ robust software. Small and medium-sized businesses have adopted a completely new accounting approach that is primarily digital and paperless. With all the benefits of cloud-accounting with QuickBooks, some small sources of friction exist for some businesses with the platform. For instance, some are unable to figure out how to record cash payments in QuickBooks.
For some businesses, most payments are made in cash; hence, this becomes an important aspect to tackle. A similar issue can arise if you want to record any payments made to your personal bank account. This article will get a quick walkthrough of how you can easily enter all your expenses paid in cash and record them seamlessly.
Steps to record cash payments in QuickBooks
Once logged into your QuickBooks Account, follow these steps to easily add your cash payments and keep a tab on them:
- Click on the “Accounting” Tab in the left list menu, and click on “Chart of Accounts” in the extended menu option.
- The “Chart of Accounts” section will open up to give you a preview of your regular checking account. You probably don’t have any cash account added yet, which is the first thing you’d need for recording cash payments.
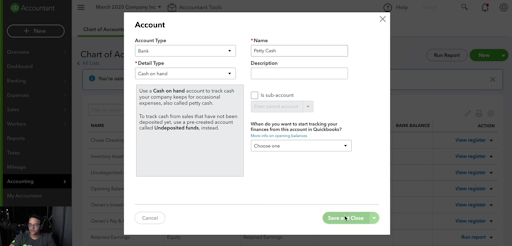
- Click on “New” on the top right of the screen. Next, fill in your account details – “Account Type”, “Detail Type” – which will be “cash on hand” in this case, “Name”, and “Description” for your account.
The filled-in details will be complete as the snippet shown below. Next, click on “Save and Close” to add this account.
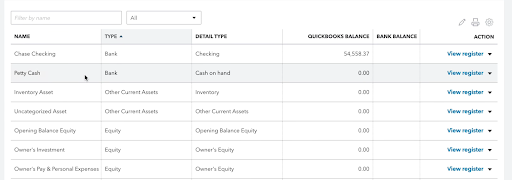
4. Once your petty cash account is added, it shows up in your “Chart of Accounts” list with 0 bank balance.
5. For any cash expense or payments recorded, Click on “New” and choose “Expense” or “Invoice”, depending on if you made a payment in cash or are to receive one.
6. The process in the next step will be the same as recording a regular expense transaction, with the only difference being that you would have to choose your “Cash” bank account instead of a regular checking bank account to record this transaction.
7. Pick the “Payment Method” as Cash. It would be best to define the clear “Category” that you would use to classify this transaction. A short description of the transaction can also be added.
With these steps, you can record any payments made in cash.
Additional Tip – Adding cash expenses without adding in a cash balance or any income source through cash will show a negative balance in your QuickBooks Cash on Hand account.
Note – In case of a cash payment recorded through invoicing, i.e., the transaction recorded through the “Invoice” tab, these are the detailed steps you can follow:
- First, select the Invoices on the left menu.
- Next, find your particular invoice and “Mark as Paid”.
- This amount now needs to be recorded manually into your account.
- Next, click on the “Transaction” Menu and add a transaction. Enter the details and “Save”.
Steps to record sales made in cash (Receiving a sales amount in cash)
A similar process can be followed if you want to record sales made in cash in your Cash account.
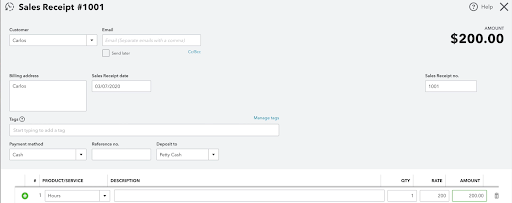
- Click on “New” in the left top corner of your QuickBooks dashboard. This time you need to select “Sales receipt” in the “Customers” menu.
- Add a sales receipt for the customer with their Name, Payment Methods as “cash”, and the amount paid.
- This money will now reflect a positive amount in your Cash on Hand account (opposite to expenses received payments depicted as a positive balance).
Final Lines
Thus, adding cash payments, expenses, and sales amounts to your QuickBooks accounts is pretty straightforward. However, while clubbing these numbers with your digital payments balances, keep in mind the dynamics of payments in cash. Like a regular account, any expenses will show a reduced payment, while received payments will increase the balance.
The only time when this can be confusing is when an odd cost is added without any cash received. Then, it will show an entirely negative amount.
We hope this quick guide and some additional tips to navigate cash payments through QuickBooks have made things quite clear. We can indeed say that QuickBooks is fully equipped to handle a dynamic cash and digital payments flow. If you haven’t tried recording your cash payments yet, follow our concise guide to do so easily!
More Posts for You: